The Underarm Seam Test Shows Why a Sleeveless Top Gapes
A quick fitting check separates a simple size mismatch from problems with bust shaping, strap position, or the armhole cut.
Women's · October 10, 2026 · 8 min read
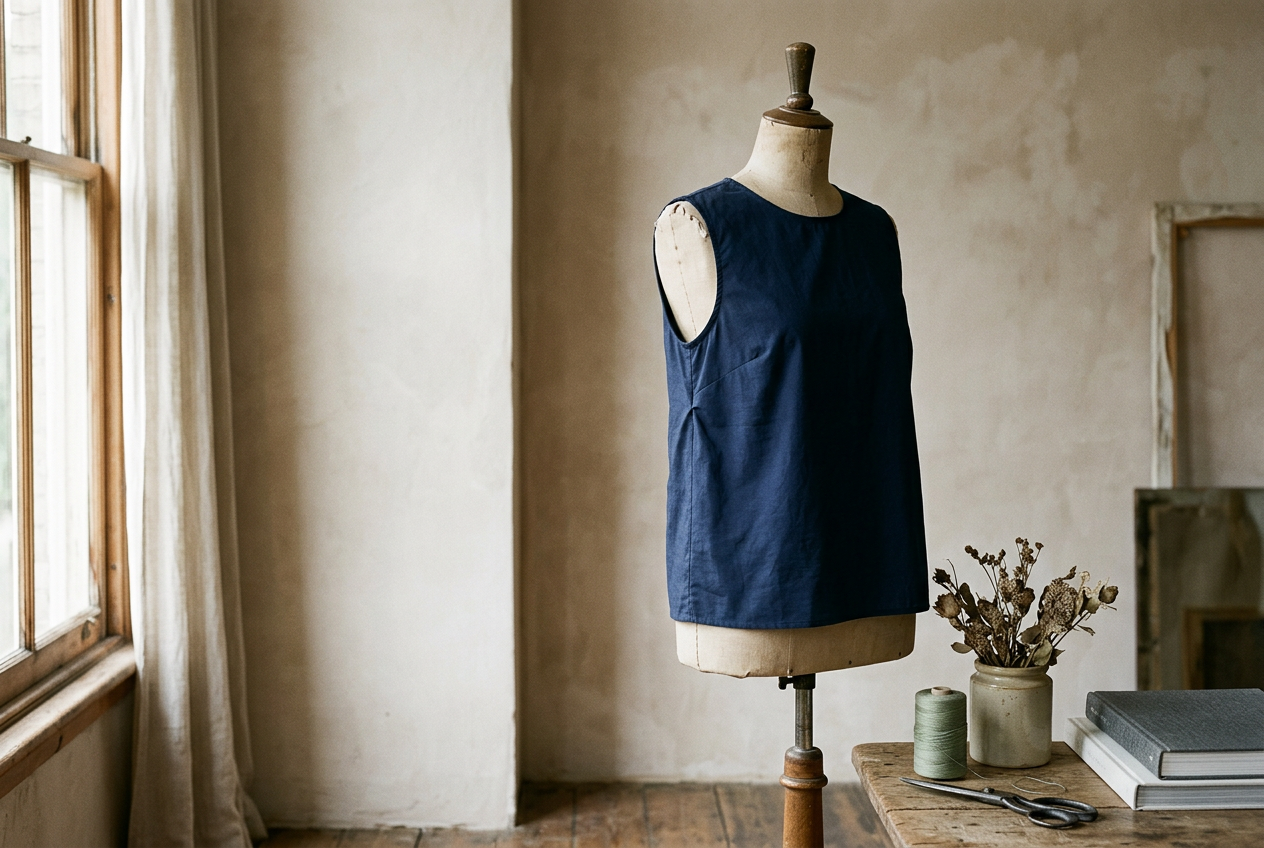
The test garment for this walkthrough is a navy cotton-poplin shell with fixed shoulder straps, a bust dart and an armhole that reveals the outer edge of an everyday underwire bra. The top looks correct while standing still, but after walking and reaching, the front shifts toward the neck and the opening at the side grows.
That combination matters. A low armhole alone can expose a bra, while forward movement usually points to missing room or length over the bust. Treating both as one generic sizing problem often leads to a smaller top that pinches or a larger one with an even deeper opening.
This is women’s fit coverage because the walkthrough deals with bust shaping and conventional bra coverage, though the basic seam check works on any sleeveless garment.
Set up the top before judging it
Wear the bra you expect to use with the top. A molded underwire bra, an unlined bra and a bralette can end at different points near the underarm, so switching bras during a fitting can make a stable armhole look inconsistent.
Settle the top from the shoulders instead of pulling down at the hem. Let your arms hang, then reach forward once and lower them. The armhole depth, meaning the distance from the shoulder to the bottom of the opening, should allow movement without dropping far enough to uncover the bra or the soft area below it.
Now look at the whole garment. On the navy shell, the neckline stays level, but the front hem sits slightly higher than the back and the side seam leans toward the front. Its bust dart, a stitched wedge that creates shape over the bust, also ends below the fullest point rather than aiming toward it. Those clues suggest that the visible bra is not only the result of a large opening.
Do not start by tightening an adjustable bra strap or hauling the garment backward. Either move can hide the symptom for a minute while leaving the fit unchanged.
Make the underarm seam test
Stand naturally and find the point where the armhole meets the side seam. Pinch a narrow fold along that seam, taking the same amount from the front and back panels. The fold should run down the side rather than diagonally into the bust. Hold it with your fingers first.
Watch the armhole edge while maintaining the pinch. If it moves inward and covers the bra without creating pressure across the bust, the upper body of the garment is probably too wide. A smaller size may work, provided the neckline, bust and hem still have enough room. This result is common when a top fits at the hip but is loose through the upper torso.
Next, release the first pinch and lift the underarm point upward, as if the side seam ended higher. This checks depth rather than width. If lifting that point closes the exposed crescent while the rest of the front stays smooth, the armhole was cut too deep for your body or your preferred bra. A tailor may be able to raise it, although the construction decides whether the job is sensible.
Repeat the check on the back. Excess fabric distributed evenly around the opening supports a size or armhole-depth diagnosis. A gap limited to the front, especially one that points toward the fullest part of the bust, indicates a shaping issue more often than general looseness.
For a clearer trial, mark the successful fold with tailor’s chalk, remove the top and pin it from the inside. Never place pins close to the skin while moving your arm. Put the garment back on and reach forward again. The test takes only a fitting-room-length pause, but that second movement check prevents an alteration that looks good only in a rigid pose.
Read a low armhole differently from a large top
A deep armhole has a low underarm point even when the top fits through the neckline and chest. The opening may reveal the side band of a bra, yet the fabric does not form a loose bubble above the bust. Sizing down can lift the opening a little, but it also reduces room everywhere else and may pull the armhole edge into the front of the shoulder.
Construction limits the repair. A bound armhole, finished with a narrow strip wrapped around its edge, can be difficult to raise neatly because there is rarely spare fabric at the bottom. A lined top or one finished with a facing, an interior piece that supports the opening, may require partial disassembly. Adding a small fabric gusset can fill the low area, but matching navy poplin in color, weight and wear is harder than the sewing itself.
For an inexpensive shell, a visible insert or extensive armhole reconstruction is rarely worth paying for. Look for a higher-cut armhole instead.
Check whether the bust is borrowing fabric
The navy shell’s more important failure appears after movement. Its side seam comes forward and the front hem rises because the bust is using width and length that the pattern did not allocate there. Pinching the side seam covers the bra, but it also creates a horizontal pull from the armhole toward the bust. That failed pinch rules out a clean size-down.
Look for tension lines radiating from the bust, an armhole gap concentrated at the front and fabric that will not remain under the arm after being smoothed into place. The top may feel roomy when measured around the body because circumference alone does not show where the fabric sits. A larger size can supply more bust room, though it may widen the shoulders and lower the armhole at the same time.
A full-bust adjustment, meaning a pattern change that adds width and length to the front without enlarging the back, addresses this problem before a garment is cut. Altering a finished top to achieve the same result is harder, particularly when there is little seam allowance or the dart sits in the wrong place.
The practical alternative is a different cut: more front shaping, a better-positioned dart, princess seams that run vertically through the bust, or cup-specific sizing. On the navy shell, that is the better decision. Taking in its side seam would conceal the bra at the cost of comfort, while raising the armhole would leave the forward pull untouched.
Separate strap position from strap length
Long straps lower the entire top. If the neckline, bust dart and armhole all sit below their intended positions, lift both straps at the shoulder and reassess. When every horizontal point rises into place together, shortening adjustable straps or having fixed straps altered is a direct repair.
Strap position is different. A strap set too far toward the outer shoulder can pull the armhole edge outward, while one placed too close to the neck may leave the outer chest insufficiently covered. Pinching the strap shorter will not correct that geometry. Moving a strap can help on a plain woven shell, but the tailor must preserve the neckline and armhole finish, and a wide relocation may distort both.
The navy shell’s straps remain stable and its neckline is already at the right height. Shortening them would lift the bust dart above its useful position, so the straps are not the answer even though they are the easiest part to alter.
Let the side seam make the final call
A side seam should hang roughly vertical beneath the arm. It need not divide the body with mathematical precision, but it should not sweep toward the front after a few steps or twist around the torso.
If the seam stays vertical and an even pinch removes the gap, try another size. If it stays vertical but the underarm point is visibly low, compare tops with higher armholes before paying for reconstruction. A seam that pulls forward, paired with front-only gaping, calls for more bust shaping or a different cut. A top that drops everywhere may need shorter straps.
Fabric changes how firmly to interpret the test. Crisp cotton poplin records tension clearly, which is why the navy shell’s drag lines are useful. A rib knit can stretch around the bust and recover at the armhole, while a soft rayon weave may collapse into a gap without obvious lines. Move in the garment and watch where it returns rather than relying on a single mirror view.
The right purchase is the one that passes the movement check without forcing the bra to solve a pattern problem. In this case, the navy shell goes back. Its exposed bra looks alterable, but the underarm seam test shows that closing the opening would make the front tighter and preserve the pull.
Questions people ask
Can a tailor fix a gaping armhole on a sleeveless top?
A tailor can often take in a loose side seam or shorten straps. Raising a deep armhole is more involved because the binding, lining or facing may need rebuilding, while front-only gaping caused by insufficient bust shaping may require more fabric than the finished garment contains.
Should
I size down when a sleeveless top shows my bra?
Size down only if an even pinch at the side seam covers the bra without causing bust tension, a rising hem or a distorted neckline. If the side seam pulls forward or the gap points toward the bust, a smaller size will usually intensify the underlying fit problem.
Does a visible bra always mean the armhole is too low?
No. A deep armhole exposes the bra with relatively even looseness, but a lack of bust room can pull the front edge away from the body and create a similar opening. Check the side-seam direction and repeat the test after reaching forward.
Can changing bras fix the gap?
A bra with a narrower side wing or differently placed strap may stay hidden, making the top wearable without alteration. It does not correct forward pulling, misplaced darts or an unstable side seam, so move in the top before deciding that bra compatibility has solved the fit.
One update a day
Today's fashion update, in your inbox
One fashion update each morning — no hype, no filler, just pieces worth wearing.