Test a White Button-Down for Gaping Before You Buy It
A shirt can look smooth at rest and pull open as soon as you move. This fitting-room check reveals weak button placement, insufficient bust room, and plackets that will not stay flat.
Women's · September 29, 2026 · 7 min read
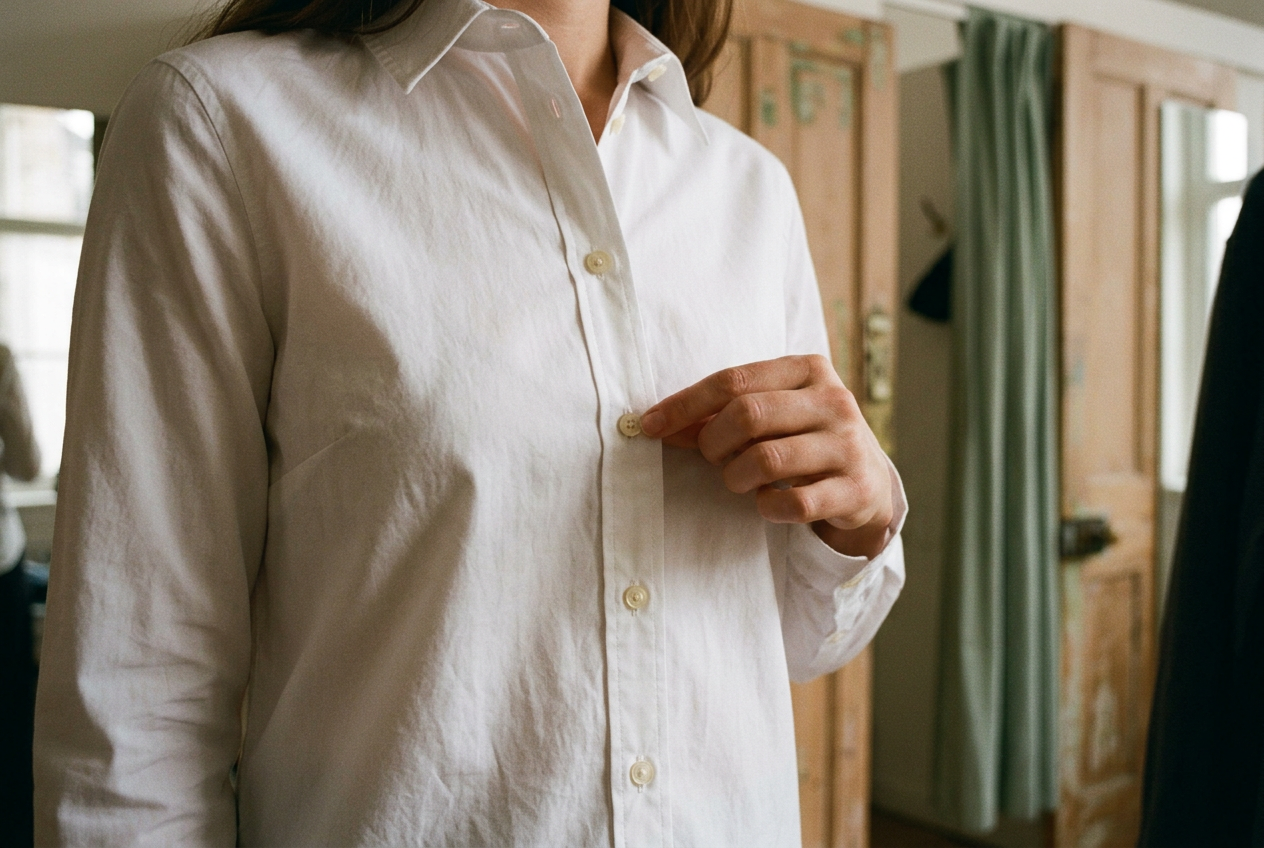
The test shirt is a white cotton-poplin button-down in my usual women’s size, worn first over a regular bra and then tucked into high-rise trousers. Standing still, it looked right: the shoulder seams ended where they should, the collar sat cleanly, and the front appeared smooth. Reaching toward the fitting-room bench opened a narrow gap directly across the bust.
That small failure is the point of this test. A shirt may pass the mirror check while your arms hang down, yet the button placement and cut can still turn ordinary movement into a recurring adjustment. White fabric makes the problem more obvious because skin, a bra, or a dark camisole creates contrast through even a slim opening.
This is women’s fit coverage, focused on shirts shaped or sized for a fuller bust. The same movement test can help anyone, but the alteration choices here assume that the shoulders fit while the shirt needs more room or control through the chest.
Map the buttons before judging the size
Start with the button nearest the fullest part of your bust. On the test shirt, one button sat above that point and the next sat below it, leaving the most projected area supported only by the fabric between them. That long unsupported section became the gap when the shirt moved.
A better arrangement places a button at, or slightly above, the fullest area. It does not need to line up with mathematical precision, but it should be close enough that the button and buttonhole hold the two fronts together where pressure is greatest. Brand size charts rarely tell you this. Two shirts with the same chest measurement can behave differently because their buttons begin at different heights or sit farther apart.
Close every button you expect to wear, then look at the front straight on and from the side. A horizontal crease running from the bust toward the armhole means the fabric is under tension. A button that tilts toward its buttonhole is another warning, as is a sliver of the inner placket showing while you stand still.
Do not dismiss a tiny resting gap as something that will soften with wear. Cotton poplin may relax a little during the day, but washing can remove that temporary give, and the button position will not change. The test shirt’s gap was modest at rest and clear in motion, which made it a construction and fit problem rather than a matter of breaking in the fabric.
Check bust ease without losing the shoulder fit
Bust ease is the difference between your body measurement and the shirt’s measurement at the chest. A button-down needs enough ease for breathing and arm movement, though the useful amount depends on whether the cut is fitted, straight, or oversized.
With the shirt buttoned, pinch a small fold at each side of the bust rather than pulling all the extra fabric from the back. You should be able to lift some fabric without making the front buttons shift. If there is nothing to pinch and the shirt already shows horizontal drag lines, the chest is too tight even if the waist fits.
The opposite result matters too. Plenty of loose fabric at the back does not prove there is enough bust room. A shirt can be broad through the torso but flat through the front, particularly when its pattern has little shaping. On the test shirt, the back had visible ease while the front still pulled, so the apparent room did not reach the place that needed it.
Try the shirt with the bra or base layer you would normally wear. A molded cup, minimizing bra, soft bralette, and bare layer can each change how the fabric travels over the bust. There is no need to bring several options into the fitting room, but testing with an unusually thin or compressive layer can disguise a problem that returns at home.
Read the placket, not just the fabric
The placket is the reinforced strip that carries the buttons and buttonholes. Its job is to keep the shirt front stable, yet stiffness can help or hurt depending on how the strip is built.
A moderately firm placket spreads tension instead of letting the fabric collapse between buttons. One that feels as soft as the shirt body may curl inward, exposing the gap sooner. A very rigid placket has its own failure: when the bust pushes it forward, the strip can stand away from the body as one hard panel, creating a longer opening rather than several small ripples.
Run two fingers down the closed front. The layers should lie flat without twisting, and the buttonholes should not look stretched at their ends. Then view the shirt from the side. On the test shirt, the placket looked flat above the chest but tipped outward below the upper button once my arms moved, a sign that the firm strip was levering away from the body.
Fabric weight changes how visible this becomes. Dense oxford cloth can conceal a little strain but feel bulky under a jacket, while fine poplin shows pulling quickly and may become translucent where it stretches. Neither weave guarantees a better fit. The button map and pattern shape still decide whether the front stays shut.
Put the shirt through real arm movement
Keep the shirt buttoned and untucked for the first round. Reach both arms forward as though holding a steering wheel, cross them loosely, and lift one arm high enough to reach a shelf. Turn your torso in each position. The sequence takes less than a minute and reproduces more useful tension than repeatedly tugging the hem in front of a mirror.
Watch the section between the bust-level buttons. A shirt passes when the placket stays overlapped and returns to place without help. A brief ripple is normal. A visible opening, a button pulling sideways, or a front that remains caught under the bust after your arms come down predicts regular readjustment.
Sit if the fitting room has a bench. Sitting changes the torso angle and can push a tucked shirt upward, which is why the test shirt appeared secure while standing but opened again once tucked and seated. Repeat one forward reach with the shirt tucked into the rise you usually wear. A snug waistband may anchor the hem and increase strain at the chest; a looser tuck may release enough fabric to hide the same weakness.
Raise your arms only as high as your normal day requires. A tailored shirt does not have to remain perfectly still through exercise-level movement, but it should manage commuting, typing, putting on a coat, and reaching across a table without exposing the layer underneath.
Sizing up can create a different fit failure
Trying the next size is useful, but compare the shoulder before celebrating the extra chest room. The shoulder seam should finish close to the point where your shoulder turns into your upper arm unless the shirt is intentionally dropped-shoulder or oversized. When that seam falls too far down, the sleeve can look collapsed and the armhole may shift low enough to restrict movement rather than improve it.
On a crisp white shirt meant to sit under jackets, an oversized shoulder also adds fabric at the upper sleeve and back. That bulk can bunch under a blazer even though the front finally stays closed. If one size fits the bust and is only a little loose through the waist, tailoring the body may be sensible. If sizing up makes the collar, shoulders, and sleeves wrong, the shirt’s pattern is the issue.
Look instead for a cut labeled curvy, shaped, or full-bust, then verify it with the same movement test. Labels are inconsistent. The useful difference is more length and width through the front chest without a matching increase across the shoulder.
Match the fix to the size of the gap
A hidden snap is the cleanest fix for a shirt that fits well and opens only between two buttons. A tailor can sew a small snap inside the placket so the closure is invisible from the outside, catching the inner layers to minimize visible stitching. It adds security without changing the button line, though a snap under heavy tension may still pop open or make the surrounding fabric pucker.
Adding a matching button and worked buttonhole between the existing ones is sturdier, provided the spacing still looks deliberate. This costs more effort than a snap because the buttonhole must be cut and finished, and very narrow plackets may not have room. Moving one existing button inward can correct slight looseness, but it cannot create meaningful bust ease and may pull the center front off line.
A tailor may be able to release the side seams if there is seam allowance, meaning spare fabric left inside the stitched seam. Many mass-market shirts leave little to work with, so inspect inside before counting on this option. Adding fabric through the side or underarm is a larger alteration and is rarely the sensible rescue for an ordinary cotton shirt.
When the larger size fits the shoulders reasonably well, take in the waist or add back darts, which are stitched folds that remove excess fabric and shape the body. That route preserves bust room while controlling a boxy torso. It cannot repair a collar that has become too large or shoulder seams that hang down the arms.
Fashion tape works for a single wear, especially under a jacket, but sweat and repeated movement can loosen it. It may also leave residue on the placket. A camisole makes an opening less revealing without stopping it, while a safety pin usually creates a visible pinch and can damage fine poplin. For the test shirt, a hidden snap would control the narrow movement gap, but the strained resting crease means the better decision is a different cut.
The fitting-room decision
Buy when the shoulders sit correctly, the front has usable ease, and the placket survives the seated reach without opening. Consider a snap only for a small gap between well-placed buttons. Leave the shirt when it pulls at rest, when the placket stands away from the body, or when the size that closes cleanly also drops the shoulder seam down the arm.
Questions people ask
Can a tailor stop a button-down from gaping?
A tailor can add a hidden snap or an extra button when the shirt has enough bust room and the opening occurs only between closures. If the fabric is tight at rest, alteration options depend on spare seam allowance. A snap cannot replace missing width and may pucker or open under tension.
Should I size up in a white button-down?
Size up if the larger shirt closes smoothly and its shoulder seams still sit near your shoulder points. Skip that strategy when the collar becomes loose, sleeves grow too long, or the shoulders collapse down the arms. A full-bust cut may add front room without enlarging every other area.
Where should a shirt button sit at the bust?
Ideally, a button sits at or slightly above the fullest part of the bust, where it can hold the two sides of the placket together. If that point falls midway through a wide button gap, ordinary reaching is more likely to pull the fronts apart.
Will a hidden snap show through a white shirt?
A small snap should be difficult to see when it is sewn inside the placket and the stitches catch only the inner layers. Fine or translucent poplin may reveal a faint outline, so check the closed shirt under bright fitting-room light before committing to the repair.
One update a day
Today's fashion update, in your inbox
One fashion update each morning — no hype, no filler, just pieces worth wearing.