The Arm-Lift Test Catches Shirts That Do Not Really Fit
A shirt or dress can look right in the mirror and fail as soon as you reach upward. This fitting-room check shows whether another size will help or the cut is wrong.
August 19, 2026 · 8 min read
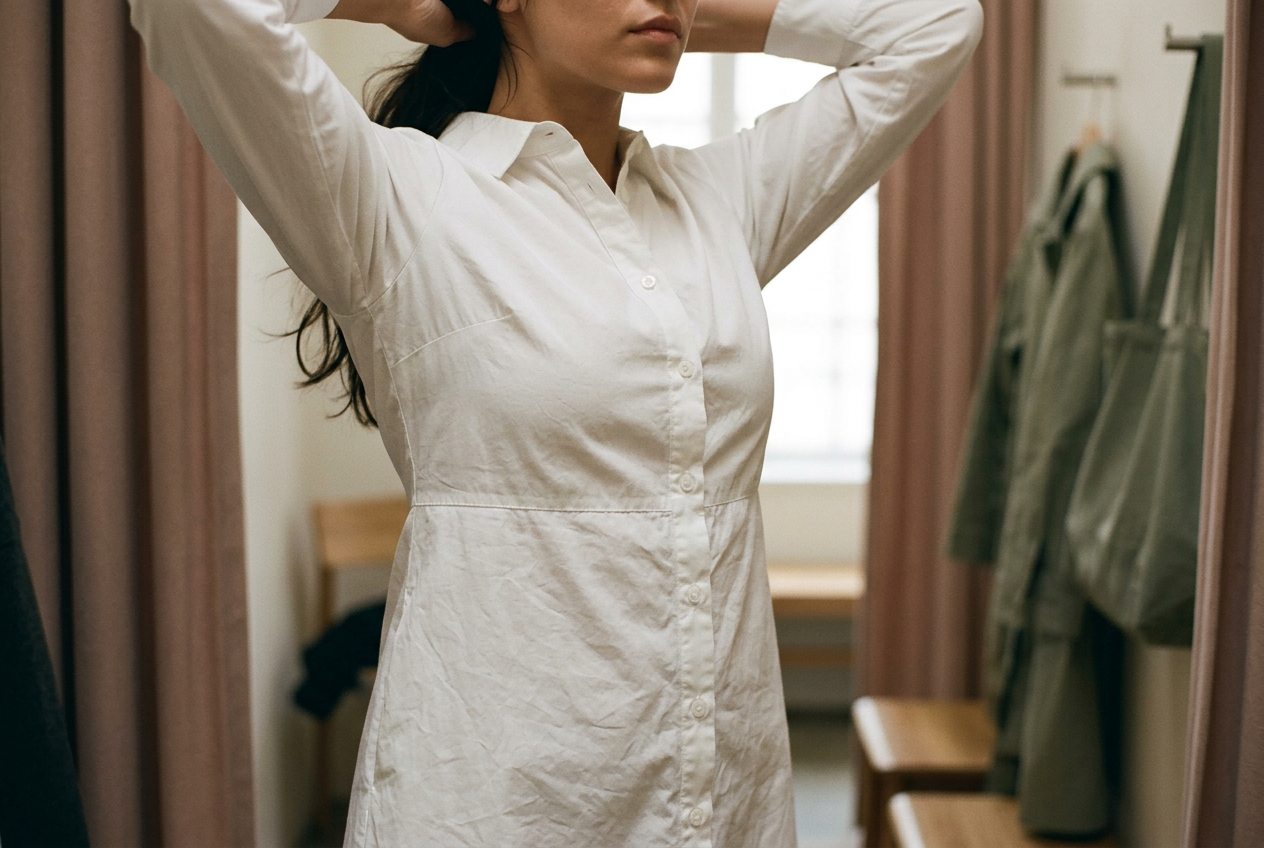
The piece I keep returning to is a knee-length cotton-poplin shirt dress, buttoned over a thin camisole with its removable belt left off. Cotton poplin is a tightly woven fabric with little natural give, so it makes construction problems easy to feel. This dress had set-in sleeves, meaning each sleeve joined the body at a seam circling the shoulder, plus a fitted waist and a full front button placket.
Standing straight, my usual size looked correct. The shoulder seams sat near the ends of my shoulders, the waist followed the body without obvious strain, and the skirt fell cleanly. Then I raised my arms. The dress climbed several inches, the waist seam shifted toward my ribs, and the placket, the finished strip holding the buttons and buttonholes, opened into small horizontal gaps across the chest.
That is the reason for the arm-lift test. Most fitting-room mirrors reward stillness, while daily wear requires reaching a shelf, putting on a coat, holding a subway strap, or pulling a bag over one shoulder. This is unisex fit advice: shirts and dresses are drafted differently across departments, but woven fabric, sleeve shape, and seam placement respond to movement in the same ways.
Run the test in a useful order
Start by fastening the garment as you intend to wear it. Button the shirt through the chest, close the cuffs, and remove any belt that could disguise upward movement by gripping the waist. If you expect to layer it over a T-shirt or camisole, wear that layer during the test rather than assuming the extra thickness will not matter.
Stand normally first. Note where the shoulder seam sits, whether the collar pulls backward, and where the hem lands. Slip two fingers inside the armhole and across the chest to check for ease, the extra room added beyond the body's measurements. You are establishing a baseline, not trying to stretch the garment into submission.
Next, reach both arms straight forward as if taking something from a shelf. Cross them loosely in front of your chest. Then raise them overhead without shrugging first or bending your elbows to protect a tight sleeve. Finish by reaching one arm behind you, which often exposes a restrictive sleeve more clearly than the symmetrical overhead lift.
The complete check takes about a minute. Watch the garment after every movement, but also notice whether it returns to its starting position when your arms come down. A hem that rises a little and settles is behaving normally. A waist seam that remains bunched under the ribs, or a shirt body that needs to be tugged back into place, has transferred too much of the arm movement into the torso.
Repeat the sequence while seated if the garment is fitted through the waist or hips. The poplin shirt dress passed its standing hip check but became shorter at the front when seated, and the upward pull from its sleeves made that change more pronounced. No single symptom condemned it. The combination did.
Read where the movement stops
A tight feeling under the arm is often blamed on a high armhole, but height alone is not the problem. A well-shaped high armhole sits close to the body and allows the sleeve to move without dragging the whole shirt upward. Trouble starts when that opening is too small for the wearer, poorly shaped, or paired with a sleeve that lacks enough room.
A very low armhole can be just as restrictive in a different way. Because its bottom edge sits farther from the armpit, lifting the arm pulls a larger section of the shirt body along with it. If your skin is comfortable but the side seams and hem rise dramatically, the armhole may be too deep rather than too high.
The sleeve cap, the curved upper section of the sleeve that fits into the armhole, supplies another clue. A cap that is too narrow can bind across the upper arm and shoulder, especially during the forward reach. Look for diagonal drag lines running from the armhole toward the biceps, a sleeve that twists around the arm, or a shoulder seam that strains even though the shirt body has room.
On the anchor dress, the forward reach created diagonal lines at the upper sleeve and pulled the shoulder seam backward. Raising both arms then lifted the waist and skirt as one unit. That sequence pointed to the sleeve and armhole relationship, rather than a skirt that was merely too short.
The placket gives a separate reading. Horizontal gaps between buttons mean the fabric is being pulled across the body; during an arm lift, brief movement is expected, but gaps that remain after the arms drop suggest too little width through the chest or back. Moving one button can close a single spot while standing, yet it cannot add the fabric needed for reaching.
Decide whether to try the next size
Sizing up is worth testing when the garment feels close in several connected places. If the chest is snug at rest, the upper sleeves press into the arms, and the back tightens during the forward reach, another size may add enough room throughout the pattern. Run the full test again rather than judging the larger size from its hanger width.
The larger size should improve movement without creating a new structural problem. Check that the shoulder seam has not fallen well onto the upper arm, the collar has not opened away from the neck, and the sleeve has not become so long that the cuff covers the hand. A slightly loose waist can often be managed with a belt or a straightforward alteration. Shoulders are less forgiving.
In the cotton-poplin dress, the next size reduced the placket gaps but did not stop the entire dress from climbing with the sleeves. Its shoulders also became too broad. That is a cut failure for this body, not a reason to keep moving through sizes until one dimension happens to work.
The strongest sign that sizing up will not help is spare room in the torso combined with restricted arms. If you can pinch excess fabric at the side seam while the sleeve still blocks a forward reach, more body width is unlikely to repair the sleeve cap. The same applies when the shoulder seam already sits too low, since the next size usually drops it farther.
At that point, change the construction. A raglan sleeve, which runs diagonally from the underarm toward the neckline, often allows more reaching room because there is no circular shoulder seam to hold the sleeve in place. A back pleat can supply useful width across the shoulder blades. Knits and stretch wovens may also tolerate motion better, though stretch should support a sound cut rather than compensate for one that fights the body.
Let the fabric affect the verdict
Poplin tells on a restrictive pattern quickly. Linen and other firm woven fabrics can do the same, although they may soften with wear; softening does not create missing sleeve width or lower a hem that rises too far. A small amount of elastane can make reaching more comfortable, but the garment should still return to shape instead of remaining strained around the buttons.
Slippery, draped fabrics can hide drag lines in the mirror while still limiting reach at the seam. Trust the movement before the appearance. If the fabric cuts into the front of the armpit, forces you to shorten your reach, or makes you worry about tearing a seam, the fit has already charged too much in comfort.
Sheer fabric needs one extra check. Raise your arms while facing both front and side mirrors, since a dress hem that seems acceptable at rest may expose the slip or underlayer once the bodice travels upward. A longer hem can provide a margin, but it does not correct the mobility failure causing the rise.
Know which alterations are realistic
A tailor can sometimes release a seam when the garment contains enough seam allowance, the extra fabric enclosed beside the stitching. Adding an underarm gusset, a small panel inserted to create movement, is more involved and may remain visible. Recutting a sleeve cap or rebuilding an armhole is usually poor value on an ordinary ready-to-wear shirt or dress.
Do not plan to fix the anchor dress by adding a belt. The belt would hold the waist near its proper level, but every overhead reach would force more strain into the buttons and underarm seams. I would leave that cut and look for a similar poplin dress with a back pleat, roomier sleeves, or a shaped armhole that lets the dress stay down while the arms go up.
Questions people ask
How much should a shirt rise when I lift my arms?
Some movement is normal, especially in a fitted woven shirt. The useful distinction is recovery: the hem should settle close to its starting point when your arms come down. If the shirt stays bunched around the waist, exposes skin you intended to cover, or needs repeated tugging, the cut is transferring too much movement into the body.
Does a tight armhole mean I need a larger size?
Try the larger size when the chest, back, and upper sleeve also feel close. If the torso already has spare room, the shoulder seam sits correctly or slightly low, and only the armhole pinches, sizing up will probably distort the shoulders without solving the sleeve shape.
Can a tailor fix sleeves that restrict movement?
Minor tightness may improve if the seams contain enough allowance to release. Adding a gusset is possible but more visible and labor-intensive, while rebuilding the armhole or sleeve cap can cost more effort than an ordinary ready-to-wear garment merits. Ask before buying if the purchase depends on that alteration.
Should
I perform the arm-lift test on stretch shirts?
Yes. Stretch fabric can disguise a poor cut by yielding during the reach, so check whether it snaps back without rippling at the placket or remaining tense under the arms. The shirt should permit the movement without pressing hard into the skin or dragging its hem far above the waistband.
One update a day
Today's fashion update, in your inbox
One fashion update each morning — no hype, no filler, just pieces worth wearing.