Your Orthotic Fits the Sneaker. Your Foot May Not.
A removable insole does not guarantee room for an orthotic. Compare the two inserts, then test heel height, toe space and tongue pressure before the shoes leave the house.
August 10, 2026 · 8 min read
A sneaker with a removable insole looks orthotic-friendly on paper. Pull out the thin piece of foam, drop in the corrective insert, lace up and proceed with life. Then the heel starts climbing out of the collar, the tongue presses across the top of the foot, or the little toe spends an afternoon negotiating for basic rights.
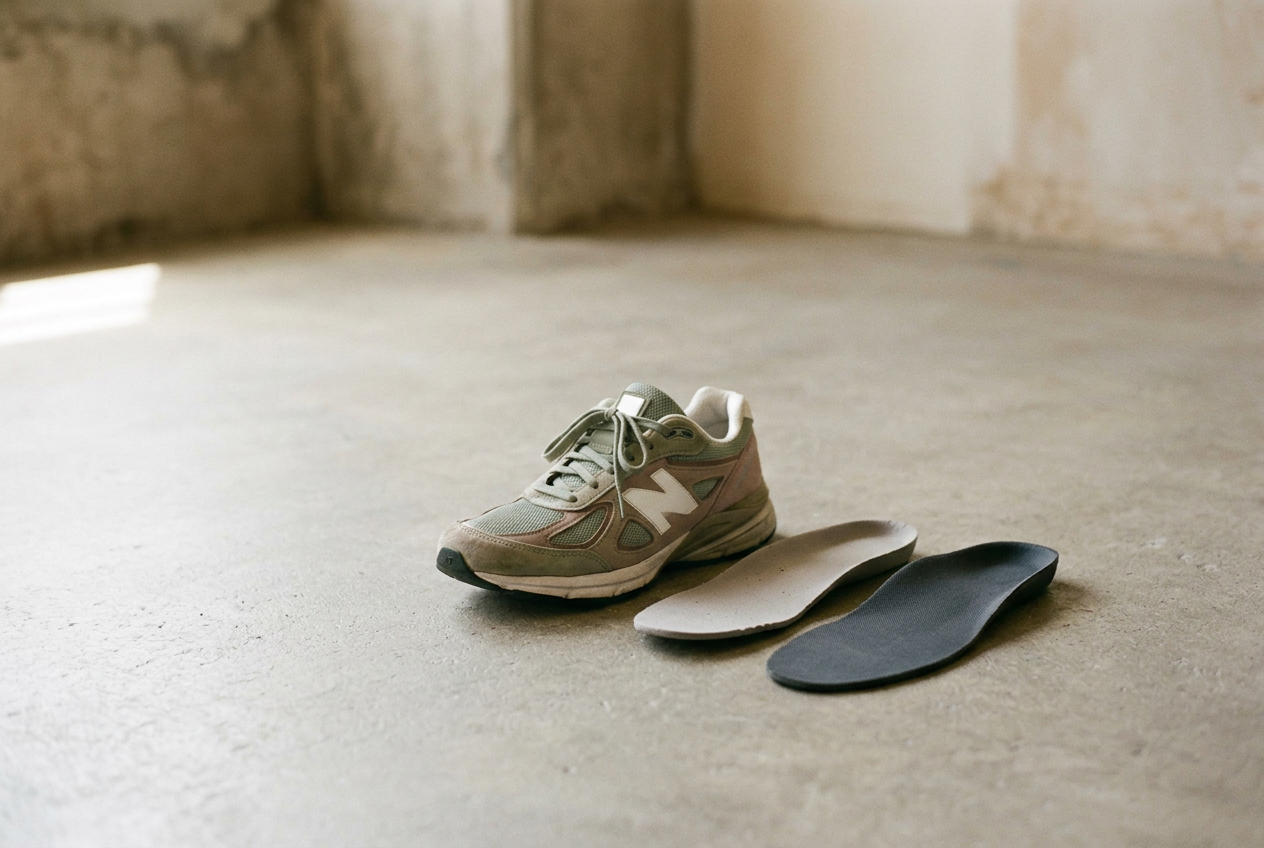
For this walkthrough, the reference shoe is the New Balance 990v6, a lace-up mesh-and-pigskin-suede sneaker that New Balance lists with a removable insert. It is a useful case because the factory insert comes out without dismantling the shoe, yet that feature alone says nothing about whether a thicker replacement will preserve the fit. The same test applies to unisex sneaker shopping across women’s and men’s size ranges, provided you use the width and size system intended for your foot.
This is fit guidance, not medical advice. An orthotic, meaning an insert designed to alter support or foot position, may have been bought over the counter or prescribed for a specific need; this article can help determine whether it physically fits a shoe, but it cannot tell you whether the device is right for your body.
Start with the factory insole
The original insole is your reference measurement. A sockliner, meaning the factory layer directly under the foot, may look insubstantial when held in one hand, but it occupies space from heel to toe and often has a raised rim around the back. Its shape also matches the shoe’s last, the foot-shaped form around which the upper was built.
Take the 990v6 sockliner out and place it beside the orthotic on a hard, level surface. Do not judge only by the thickest point at the heel. Compare the side profiles through the arch and forefoot, where a few extra layers can raise the foot into the tongue or reduce the space above the toes. Compress both pieces between finger and thumb as well.
Soft factory foam may flatten under weight, while a firmer orthotic keeps more of its apparent height once you stand.
Trace around the factory sockliner on paper, then set the orthotic over that outline. A full-length replacement should sit within the shape without folding at the toe or wedging against the sidewall. If it is trim-to-fit, cut in small stages using the factory sockliner as a pattern, while preserving any manufacturer markings that indicate where cutting is allowed. An orthotic with a rigid shell should not be cut unless its maker says it can be.
Do not stack the orthotic over the original insole unless the orthotic manufacturer or a clinician specifically directs it. Stacking is the quickest way to consume internal volume, which is the usable space surrounding the foot inside the shoe, and it can make an otherwise correct sneaker feel a half size too small without adding any useful length.
Heel-cup depth changes where the collar lands
A heel cup is the curved rear section of an insert that cradles the heel. A deeper cup can stabilize the foot, but it also has to fit inside the shoe’s own heel structure, and the combined geometry may raise the ankle above the padded collar.
Set the two inserts heel to heel on the table. Look at the height of the orthotic under the center of the heel, then note how far its cup rises around the sides. In the 990v6, the structured rear and padded collar leave less room for improvisation than the open interior might suggest. If the orthotic sits on top of a wrinkle, a seam or a narrow part of the midsole, it may rock rather than settle flat.
Install the orthotic and press firmly around its heel with your fingers. The back edge should meet the rear of the shoe, and the base should not seesaw when pressed on either side. A gap at the back pushes the foot forward. A cup that is too wide can bow inward or hold the insert above the shoe bed, which steals space while creating a small, remarkably efficient source of irritation.
Put the shoe on without lacing it. Stand and check where the collar now touches the ankle. If your heel sits noticeably higher than it did on the factory sockliner, lacing harder may hide the problem for several steps, but it will not restore the original collar height.
Toe room is measured under weight
Length on a size label cannot describe what happens after a thick insert lifts the foot into the narrower upper. The toe box, meaning the front compartment around the toes, usually curves downward and inward; raising the foot can therefore create crowding even when there is still empty space in front of the longest toe.
Wear the socks you intend to use with the sneakers. Stand with full weight on both feet, because feet spread under load, then bend one knee forward while keeping the heel down. Your toes should remain flat and able to move. Pay attention to contact above the big toenail and along the outside of the little toe, rather than relying on the traditional thumb-width check at the front.
Do not solve vertical crowding by buying a longer shoe without checking width and heel hold. Extra length may move the shoe’s flex point ahead of the ball of the foot, while the wider rear can introduce slipping. A roomier model, a wide version or a sneaker built with more depth may be the cleaner alternative. New Balance offers multiple widths in many models, but width and internal height are separate dimensions; a wider 990v6 may relieve side pressure without providing enough room over a tall orthotic.
The tongue reports lost volume first
Tongue pressure often appears before obvious toe crowding. The foot has been lifted, the laces now travel across a higher surface, and the tongue is trapped between them and the top of the foot. Tightening the laces to stop heel movement can make that pressure worse.
Lace the shoe as you normally would, starting near the toes and working upward without hauling each crossing tight. Check whether the two sides of the eyestay, the reinforced area holding the lace holes, sit farther apart than they did with the factory sockliner. A small change may be manageable. A tongue that feels like a firm band across the foot after a few minutes is not waiting to develop a charming personality.
You can reduce pressure by loosening the middle crossings or skipping the eyelets directly over a sensitive area, but lacing changes have limits. If the heel then lifts, the shoe lacks enough volume for that orthotic and foot combination. A thinner orthotic approved for your needs, or a deeper sneaker, is a more credible fix than choosing between numbness on top and friction at the back.
Use this indoor try-on sequence
Keep the outsole clean and follow the retailer’s return rules. The point is to find structural problems before a hopeful outdoor walk converts them into owned problems.
- Establish the original fit. Wear the 990v6 with its factory sockliner and intended socks for several minutes indoors. Notice collar height, lace tension and where the shoe bends as you step. This baseline matters even if the original insert lacks the support you need.
- Remove and compare. Check the orthotic against the factory sockliner for overall outline, heel thickness and forefoot height. Make sure the shoe bed is clear of loose adhesive or folded fabric. If the factory insert is glued down, do not tear it out merely to win an argument with footwear.
- Seat the replacement. Slide the orthotic in heel first, press it flat, then run a finger around the edge. The toe should not curl, and the heel should not rock. A three-quarter-length orthotic must end smoothly under the foot rather than creating a hard ledge.
- Stand before lacing tightly. Check toe movement, pressure above the nails and collar position. Lace to normal walking tension. If the top of the foot starts throbbing while you are still beside the chair, the neighborhood will not improve matters.
- Walk on a hard indoor surface. Take normal strides, turn sharply and climb stairs if available. Heel lift, meaning the rear of the foot rising away from the shoe with each step, often appears during push-off or on stairs rather than while standing.
- Repeat after ten to fifteen minutes. Feet warm and spread, while foam begins to compress. Recheck the little toe, the top of the foot and the back of the heel. Persistent pinching, numbness, burning or a change in gait is a stop signal, not a break-in plan.
With the 990v6, the removable factory insert makes this sequence possible and keeps the comparison clean. It does not guarantee the outcome. The pass condition is dull but useful: the orthotic lies flat, the heel stays inside the collar, the toes retain space and ordinary lacing holds the foot without pressure.
Know when the sneaker is the wrong shape
A poor swap does not always mean the orthotic is too thick. Its arch may sit too far forward for the shoe size, the heel cup may be broader than the shoe bed, or the forefoot may flare beyond the sneaker’s internal width. Those are shape conflicts. Sizing up can move every mismatch rather than fixing it.
Bring the orthotic when shopping and remove the display shoe’s sockliner before judging fit, with staff permission. Favor models whose factory inserts lift out cleanly and whose uppers have enough depth through the midfoot. Stretch mesh may disguise pressure during a brief fitting, but it cannot create space in a rigid toe cap or move a low lace panel.
If an orthotic was prescribed, ask the clinician who supplied it about suitable shoe construction and acceptable trimming. Seek medical guidance for pain, persistent numbness, skin damage or a worsening symptom. Footwear should not turn treatment into a second complaint.
Questions people ask
Can
I put an orthotic on top of a removable sneaker insole?
Usually, the factory insole should come out before a full-length orthotic goes in. Stacking both layers raises the heel and reduces toe and tongue space; follow the orthotic maker’s instructions or a clinician’s direction if your device is designed to sit over an existing sockliner.
Does a removable insole mean a sneaker is orthotic-friendly?
No. It only means the factory layer can be removed. The replacement still has to match the shoe bed, sit flat inside the heel structure and leave enough internal volume for the foot without causing heel lift, toe crowding or pressure from the tongue.
Should I size up to fit an orthotic?
Not by default. More length can place the shoe’s flex point incorrectly and loosen the heel, while leaving a height problem unchanged. First try the orthotic in your usual size, then compare a wider or deeper model if the upper presses.
How much heel lift is acceptable in sneakers?
A slight sense of movement can occur in some shoes, but repeated visible lifting during normal walking or stairs invites friction and instability. Relace once at ordinary tension; if stopping the lift creates painful tongue pressure, the shoe and orthotic are a poor fit.
One update a day
Today's fashion update, in your inbox
One fashion update each morning — no hype, no filler, just pieces worth wearing.